Tag: handyman

Drywall Repair – How to Patch Holes in the Wall

Drywall Repair is an affordable and effective option for restoring walls damaged by dents, cracks, nail holes, water damage or other issues. Professional services include inspection and assessment followed by drywall patching, sanding, priming, and painting to match existing wall color. Contact Drywall Repair Phoenix for professional help.

Drywall Repair

Visual signs of drywall damage include stains, swelling or soft spots, cracks, and nail pops. Proper preparation is key to a successful repair process, including proper cleanup and supply selection.

Drywall is ubiquitous in modern homes and buildings, providing a fire resistant and inexpensive alternative to wood construction. But it doesn’t take much to damage drywall, which is why knowing how to patch holes and cracks is so important. Whether it’s from an accident or simply as a result of normal wear and tear, holes in drywall can occur in many different ways and must be repaired promptly to avoid water leaks or structural integrity issues.

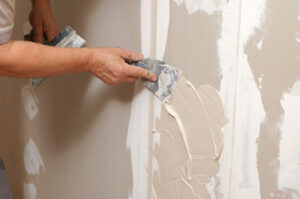
Before beginning a drywall patch, you should clean the damaged area and make sure there are no loose particles. You’ll also want to make sure there are no hidden issues that may require further inspection or repair, such as electrical or plumbing problems. Once the damaged area is cleaned, a putty knife can be used to apply a thin layer of joint compound to the surface of the wall. Make sure the compound is spread evenly to cover all areas where the drywall patch will be placed.

After applying the drywall compound to the surface, you can place your drywall patch over it. Press firmly and ensure the patch is securely attached. If the patch has paper edges, it is important to slightly wet them before positioning the patch and applying pressure. This will help adhere the patch to the surface and prevent future cracking and peeling.

Once the drywall patch is in place, you can apply additional layers of joint compound to smooth out any rough areas and to prepare for painting. Sandpaper can then be utilized to smooth the sanded surface, which is critical for ensuring good paint coverage. Finally, the sanded area can be painted to match the surrounding surface of the wall.

If you have a hole in your wall that is larger than 6”, you can purchase a drywall patch kit that contains a reinforced patch with self-sticking tape. The kit can be a quick and easy solution to get rid of that pesky hole.

Repairing Large Holes

The first step in drywall repair is to visually inspect the damage. This includes looking for cracks, dents, holes, or discoloration. It’s also important to check the integrity of the drywall and studs. Upon inspection, it’s likely that the drywall needs to be replaced or repaired.

For small holes, a drywall patch kit is a great option. These kits typically include a metal patch with an adhesive backing. To use, simply remove the protective cover, cut the patch to the correct size and place in the hole. A layer of joint compound is then applied to the patch and sanded.

Large holes and dents require more extensive repairs. For this, it’s best to consult a professional. A trained technician can determine the cause of the damage and provide a proper solution. Drywall repair professionals can perform a complete inspection, assessment and restoration of the affected area. They can also handle the tape, mud, and paint process to ensure a seamless and high-quality finish.

For repairing large holes, it’s important to make sure there isn’t any wiring or plumbing behind the drywall. You can do this by using a framing square to mark cutting lines on the damaged area. Then, use a utility knife to trim the edges of the hole to create straight sides and a square or rectangular overall shape. Once the edges are straight, a drywall saw is used to cut away the damaged section of drywall.

If a new section of drywall is required, the old drywall should be cut out and removed, exposing the studs or framing behind it. Then, the replacement drywall can be cut to size and screwed in to the studs or framing with drywall screws. Using a level, make sure the replacement drywall is plumb and square before applying joint compound.

Apply a coat of joint compound to the patch, using a putty knife or trowel. Then, sand the surface of the patch smooth. After the patch is sanded, a second coat of joint compound can be applied, again allowing it to dry between applications. Once the second coat is dried, sand and feather the edge of the patch to blend with the rest of the wall. Lastly, sand and apply a fresh coat of primer or paint to the patched area.

Repairing Medium to Large Holes

Small cracks and nail pops can be a DIY project, but larger holes require more work. In this video, drywall expert Paul Silva shows how to repair medium-sized holes with an adhesive-backed patch. This approach is ideal for fixing holes caused by removed fixtures such as doorknobs or other moderate impacts. The process starts by cleaning the area and ensuring there’s no plumbing or wiring behind the hole. Next, cut the patch so that it’s a bit larger than the damaged area for sturdiness. Finally, apply a thin coat of joint compound over the patch and sand lightly.

Once the area is smooth, add a second layer of compound and feather it so that the edges blend into the wall. Allow the patch to dry completely before sanding again and painting.

It’s also important to do a visual inspection of the affected area before beginning any drywall repair to ensure that all areas are structurally sound. Look for any signs of damage, including soft spots or sagging. Additionally, probe the area with your hands to feel for any bumps or dents.

If you do spot any problems, make sure to contact a professional drywall contractor for a thorough inspection and repair. Their expertise and experience will ensure that your drywall repair is done correctly, saving you time and money in the long run.

A professional drywall contractor will begin with a thorough inspection of the damage to determine the best repair method. Then they will thoroughly clean and prepare the area, removing any loose debris and ensuring that all surfaces are free of moisture. Depending on the extent of the damage, it may be necessary to install wood backing strips or furring strips before proceeding with any drywall repair. Finally, the drywall repair will be completed using a combination of techniques, including patching, sanding, priming and painting. This will provide a high-quality, durable finish that lasts.

Repairing Small Holes

For small holes, you can use a drywall patch kit. These kits contain a self-adhesive mesh patch that sticks to the wall and covers the hole. This method is quick and easy but is not as strong as using a full piece of drywall. It is important to make sure that the edges of the patch are smooth, and that the surrounding drywall surface is properly sanded and primed before you apply the adhesive patch.

Small drywall cracks can also be repaired with spackle or a drywall compound, and then sanded and primed. If you want to repaint the area after repairing it, it is important that you choose paint that closely matches the existing color of the wall. It is a good idea to test the color in your home by painting a few chips of paint on the wall, or bringing a sample home from a paint store.

If you notice that a portion of your drywall has become discolored, this is another sign that it is time to repair it. Discolored sections of drywall are not only unsightly, but they can cause water damage and lead to mold and other issues that require professional drywall repair.

One way to prevent this problem is by installing a moisture barrier on the walls in high-risk areas, such as those near bathrooms and kitchens. You can also install a dehumidifier in the room to help reduce humidity levels.

For larger holes, a full drywall replacement is necessary. You should always use a stud finder to locate the studs behind the damaged drywall before cutting it out. Then, you can remove the old section and replace it with a new sheet of drywall. Once the new drywall is installed, it should be taped and mudded, and then sanded and primer/painted.

Drywall repairs can be simple for most homeowners, especially if you have the proper tools. However, if you have a large hole or notice other signs that your drywall needs to be repaired, it is best to call in a professional for a thorough assessment and installation.

5 Tips for a Successful Kitchen Remodel

From a minor refresh to an entirely new layout, there’s a kitchen remodel to fit any style and budget. It starts with a thorough evaluation of your current kitchen and understanding what improvements will make the most sense for you and your lifestyle. Contact Kitchen Remodel Temecula now!

A well-planned kitchen remodel goes far beyond aesthetics. It’s also a chance to introduce timeless trends like:

Cabinets are a primary element of any kitchen and serve multiple purposes. Mounted wall cabinets provide storage for dishes, utensils and other cooking tools. Cabinets can also be recessed into the wall, making them unobtrusive. Cabinets come in a variety of styles, from traditional to contemporary. Cabinets can also be made of a range of materials, from wood to laminate to thermofoil, each with its pros and cons in terms of durability, cost and appearance.

When choosing cabinets, it’s important to consider your lifestyle and design style. Do you want a sleek, modern look, or something more ornate? Cabinets can be made in a range of colors and finishes to suit any style. Adding custom details, like moldings or intricate hardware, can take your cabinets to the next level.

Another consideration is whether you prefer drawers or cabinets. Drawers can make better use of vertical space and are more efficient for storing items that are often used. However, deep drawers can be difficult to see into without squatting down, which can be inconvenient and dangerous for young children or older adults.

Cabinets can be either face frame or frameless (also known as European or euro-style). Face frame cabinets have a frame attached to the front of the cabinet box, which provides additional strength and a more traditional appearance. Frameless cabinets do not have a face frame, instead attaching the door directly to the box’s side, bottom and top panels. The type of material used for the cabinet box, as well as how the boxes are joined together — dovetail joints or butt joins, for example — will impact a cabinet’s overall strength and durability.

Countertops

Countertops are one of the largest expenses in a kitchen remodel, especially if you choose premium materials. While it’s tempting to skimp on these big-ticket items to cut costs, sacrificing quality will likely cost you in the long run in terms of longevity and resale value.

For the best results, select a countertop material that complements your cabinetry and overall aesthetic. Natural stone adds timeless elegance and warmth to any kitchen design, while engineered quartz is a durable workhorse option that resists heat and stains.

Tile is an affordable and versatile countertop material that comes in a range of colors, shapes, and patterns. It can also be installed in large sheets that reduce grout lines and make upkeep easier. Some tile countertops also feature a granite, quartz, or marble look for added appeal.

Marble’s been a popular countertop choice for decades, and it looks as chic now as ever. It’s available in several variations, including white with dramatic veining for a sophisticated feel or Calacatta for a more contemporary style. More people are also choosing repurposed or recycled materials for their kitchen counters. Recycled glass, porcelain discards, and reclaimed wood are eco-conscious options that can be shaped into customized counters.

Stainless steel is another popular countertop material that pairs beautifully with modern appliances and sleek cabinets. It’s durable and stain-resistant, but it can scratch or dent if it’s not properly cared for. Some manufacturers use an anti-corrosion coating to help protect the surface, but this coating requires periodic reapplication.

Wooden countertops are another traditional countertop that can complement a variety of styles. They’re available in a range of designs, from butcher block to joined planks and single wide staves. Wood is an eco-friendly option, but it requires regular cleaning and disinfection because it can come into contact with raw meat or other potentially contaminated foods.

Appliances

Whether you want to turn your kitchen into a chef’s ideal workspace or simply upgrade its functionality, the appliances you select will have a significant impact on the room’s appearance and function. It’s important to take careful consideration before making any major purchases. Unlike furniture, which can be bought cheaply and discarded later, appliances are essential for daily use and can’t be easily replaced or upgraded.

During the planning process, homeowners should set aside an amount of their overall budget for appliance shopping, which can account for between 15 and 20 percent of a total remodel, according to nationwide appliance retailer Appliances Connection. To make the most of your budget, begin by deciding on your “must-haves” and then build out from there. It’s also helpful to consult a professional to help navigate the extensive selection available and recommend the most suitable products for your specific needs.

As you browse the different brands, pay attention to energy efficiency, quality, size and capacity, warranties, and style. Look for smart technology features, too, that can improve your kitchen’s function and simplify your everyday routine. For example, a refrigerator with LCD screens that display its contents and allows you to set reminders will save both time and space.

Other handy upgrades you can incorporate into your kitchen are utensil holders, jar racks, or under-cabinet hooks to keep countertops clean and organized. If you have the budget, consider a wine fridge or warming drawers to add luxury amenities that enhance your cooking experience. Finally, new lighting like recessed cans and pendant lights over island or counter areas brighten the entire space and improve visibility. This will also highlight your new appliances and bring out their best colors and textures.

Flooring

If you want to update your flooring while keeping the overall look of your kitchen, opt for a natural or light-hued wood-look material. This durable, stain-resistant option is available in a variety of styles from traditional to modern. It can also be easily refinished when it gets scratched or worn. You can find a wide range of options at your local home improvement store or online.

Kitchen remodel costs vary greatly based on your budget and materials. To help you set a realistic renovation budget, we’ve created a pricing chart for different kitchen types and sizes. We’ve broken it down into low, medium and high price categories to give you a better idea of how much you can expect to spend on your project.

It’s important to keep in mind that while a kitchen remodel may boost your home’s resale value, you don’t necessarily have to spend money on every update to make your kitchen more functional for you and your family. Minor refreshes like painting cabinets or replacing hardware are cost-effective ways to breathe new life into a room without breaking the bank.

A major kitchen remodel often involves structural changes or a complete overhaul of the layout. This type of kitchen remodel can be more expensive and complicated, but it’s a great way to add value to your home while updating your personal space. This type of kitchen remodel can include everything from relocating walls to installing an island, reconfiguring appliances or expanding storage spaces. It’s ideal for homeowners who are looking to create a unique aesthetic or add luxury upgrades such as granite countertops or custom cabinetry. Depending on the scope of your kitchen remodel, you’ll likely want to hire an experienced contractor who specializes in kitchen remodeling to ensure that your vision is brought to life.

Lighting

The kitchen is a common space where meals are shared, homework is done, socializing and working from home occur, so it needs to be well-lit. The right lighting is not only a design element that enhances the style of a room but can also be a key ingredient for functionality and efficiency.

A well-lit kitchen makes for a safer, more efficient workspace that allows you to perform tasks with clarity and precision. LED bulbs offer both ambient and task lighting options in various color temperatures, which are perfect for illuminating different areas of the kitchen. Cooler light is ideal for work zones like countertops, islands, and cooking surfaces while warmer light creates a more comfortable atmosphere for dining and relaxing.

Consider incorporating more natural light to your kitchen through interior windows or skylights to create a more open and airy space. Adding windows above your sink or along one wall is a great way to increase light while creating architectural interest. Choose windows that offer unobstructed views of your backyard greenery, other rooms, or interesting sightlines across the kitchen itself.

Repainting cabinets, replacing hardware and introducing new pendants or recessed lights are affordable ways to refresh the look of your kitchen without undertaking a major remodel. For example, new silver or brushed nickel hardware and paint can update dated cabinetry while adding a fresh, modern aesthetic to your kitchen. Similarly, eye-catching chandeliers and sconces make a statement in a kitchen while elevating the style of the space.

What Does a General Contractor Do?

A worldly general contractor’s day is a jigsaw of big and small tasks. They take on various roles within construction and are adept at pivoting between them with finesse and fluidity.

GCs find sub-contractors to complete specialized construction work using several methods, including drawing on past relationships and professional connections at industry events and trade shows. Many states also regulate licensing standards to boost trustworthiness and ensure regulation compliance. Contact General Contractors Lexington KY now!

When you’re building a home, commercial space or new office, you need someone to make it happen. And that’s where the general contractor comes in. This multifaceted professional wears many hats and wields the toolbelt of leadership, mediation, and an expert understanding of a structure’s symbiotic relationship between design and functionality. From navigating zoning laws to negotiating material prices, they are the pillars of project management that keep gears moving and budgets on track, while ensuring client contentment.

They manage the overall construction of a site and oversee all the different contractors, workers and tradespeople that are needed to complete each part of the work. They typically have their own laborers and carpenters that “self-perform” some of the work, but GCs also use specialty subcontractors for the majority of the work (plumbing, electricians, roofers, drywall installers, etc).

To ensure a smooth workflow, a good GC will make sure all materials and supplies are ordered in advance. And he or she will coordinate the schedule of each trade to make sure all workers are on the jobsite when they’re needed. This keeps projects on schedule and avoids expensive delays.

General contractors find subcontractors through several approaches, including drawing on relationships with professionals they’ve worked with in the past or who are recommended by a trusted colleague. They also utilize a number of online tools and marketplaces to find reliable subcontractors. They may even hold open bidding processes with subcontractors on certain projects to secure their services and reduce costs.

Another important role of a general contractor is to negotiate with suppliers and contractors, setting expectations and managing expectations, and ensuring the correct contracts are in place. Having the right team of software and technology to perform checks, communicate issues, and automate tasks can help a general contractor manage these processes more efficiently.

Finally, a good general contractor will handle any conflicts that arise with professionalism and patience. Resolving issues quickly and in a way that benefits everyone is the best way to maintain a productive working relationship throughout the duration of your construction project.

They’re the Artists of Building

Whether it’s the concrete pours that lay the foundation for a project or the final brushstrokes of paint that add a personal touch, an experienced general contractor is masterful in both the nuances and the big picture. They see the project through from start to finish, orchestrating a symphony of tradespeople and craftspeople who play their parts in raising structures to the sky.

A GC can find subcontractors in a number of ways depending on their experience and networks. They may hire a subcontractor they’ve worked with before and trust, or they might send out an RFP (Request for Proposal) or ITB (Invitation to Bid) to subcontractors in their area, or they might use an online platform like Angi or ConstructConnect. The GC will also usually have both worker’s compensation and liability insurance to cover their entire workforce, protecting everyone on the job site.

Once a GC has hired their team, they schedule each individual tradesman to ensure they’re all on site at the right times for the work that needs to be done. Often, due to union regulations, tradesmen can only be on a job site for certain hours of the day. So the GC will have to plan the whole project around that.

In addition to scheduling, a GC will also be responsible for ordering materials and making sure they get delivered to the jobsite in the right quantities on time. They’ll also be a main point of contact for clients and other workers on the jobsite, answering questions, providing updates, and solving any issues that arise.

Another important aspect of a GC’s job is to ensure everything meets building codes and other legal requirements. They’ll also monitor the project budget, ensuring that costs don’t spiral out of control.

Ultimately, the key to a successful construction project is communication. The GC is the conduit for information between the client, the architect/design team, and each individual worker on the jobsite. So the GC has to be an effective communicator, being both clear and concise in all their interactions with each party.

They’re the Managers of a Project

A general contractor is the linchpin that holds together an entire project. Their multifaceted skillset enables them to juggle complex financial oversight, intricate project planning and intricate construction processes with effortless grace. A GC’s toolbelt includes leadership, mediation and a deep understanding of the symbiotic relationship between design and functionality. Their day-to-day responsibilities include bid preparation, client consultations and cost estimation. Unmasking their true function reveals that they are the architects of construction projects, orchestrating the outcome to ensure that form and function are in perfect harmony.

A GC’s duties also extend to overseeing the progression of the construction process, managing timelines and conforming to contractual terms. In addition, they must continually monitor the quality of work on a project, making sure that subcontractors meet and maintain established quality standards. During this phase, it’s also important for a GC to perform regular inspections of the site and resolve any issues quickly to avoid costly delays and rework.

To mitigate risks, a GC often solicits multiple bids from qualified specialty contractors. This allows them to compare and evaluate different approaches, costs and timelines. It also helps them determine if any potential subcontractors may not be able to deliver what they need to achieve their objectives.

During the project implementation phase, a GC must manage the coordination of all work activities with subcontractors. This is especially crucial when dealing with scopes of work that require specialized skills or equipment, as the performance of these specialty contractors can impact the overall success of a project. To facilitate this, a GC can organize daily jobsite meetings or huddles that bring all relevant contractors together to share progress updates, discuss any issues or concerns and promote collaboration.

Regardless of whether they are paid through a lump-sum or cost-plus contract, a GC must closely monitor cash flow. This is because they are responsible for paying subcontractors and suppliers for their services, while simultaneously paying themselves in accordance with their contracts. They must also make sure that all payments are incurred according to the schedule set out in their contracts and budgets.

They’re the Leaders of a Team

A general contractor is the leader of a team of professionals, each with their own specialized expertise. They hire subcontractors to carry out the various facets of construction jobs. During the pre-construction phase, they devise strategic plans and obtain necessary permits for projects. They also ensure efficient communication between subcontractors to prevent project delays.

In a design-build setting, they work alongside architects to ensure the integrity of a project’s design while managing timelines and conforming to contractual terms. During the construction phase, they orchestrate subcontractors to achieve the desired results and address complications as they arise. During the final stages, they conduct a thorough examination to verify that a project meets established quality standards.

Whether they’re working on commercial or residential projects, a GC relies heavily on their experience and strong network of industry professionals to succeed. They often find subcontractors through referrals from colleagues or by searching for skilled contractors on online databases and marketplaces. Other resources they use include directories from construction associations and unions, which list vetted contractors with reliable reputations. In addition, they also use professional connections made at trade shows or through personal referrals to discover talented subcontractors.

Licensed contractors are often preferred, since they’re able to offer property owners lien protection. They’re also able to demonstrate that they’re liable for any damage or injuries suffered on site and have liability insurance to cover the costs.

A GC’s toolbelt includes leadership, mediation, and a profound understanding of the symbiotic relationship between design and functionality. It’s a role that requires a unique combination of skills honed over years of experience. Among the most invaluable is their unwavering commitment to safety, providing a steel frame of protection that ensures that the people who work under their watch are treated with care and respect. In an industry that can be fraught with mistrust, their integrity is a mark of distinction. Their vigilance is a testament to the fact that they’re more than mere builders; they’re true artists who paint with steel and brick where others might have used brush and canvas.

Navigation